Subtotal ¥0.00
Master thermal printer sensor calibration to fix media out errors with expert Zebra troubleshooting and prevention tips
Understanding the “Media Out” Error
Nothing kills warehouse productivity faster than a flashing red light and a “Media Out” error when you can clearly see a fresh roll of labels sitting in the tray. After years of troubleshooting these machines, I’ve found that this “phantom” error usually isn’t a mechanical failure; it’s a communication breakdown between the printer’s “eyes” and the backing material. When the printer loses track of where one label ends and the next begins, it defaults to a fail-safe state, assuming you’ve run out of stock.
Gap vs. Reflective Sensor Mechanics
To fix the issue, you have to understand which “eye” your printer is using. Most industrial and desktop units utilize two primary sensing methods:
- Transmissive (Gap) Sensors: These align a light emitter and a receiver to “look through” the label. They detect the difference in light intensity between the thick label and the thin liner (the gap).
- Reflective (Black Mark) Sensors: These are located on the bottom of the media path. They bounce light off the back of the liner and look for a printed black line to signal the start of a new label.
If your settings are toggled to “Reflective” while you are running standard gap labels, the thermal printer media out error will trigger every single time.
Diagnostic Checklist: Rule Out the Basics
Before diving into deep menus or recalibration, run through this quick checklist to ensure the hardware is actually set up for success:
| Feature | What to Check |
|---|---|
| Media Routing | Ensure the labels pass directly through the sensor plastic guides, not over them. |
| Roll Seating | Verify the media supply hangers are snug; a wobbling roll causes tracking shifts. |
| Sensor Position | For movable sensors, ensure the “eye” is centered on the label gap, not a die-cut hole. |
| Power Cycle | Turn the unit off for 30 seconds to clear the buffer of any previous “fault” states. |
By identifying the specific sensor type and ensuring the physical path is clear, you can often fix media out fault thermal label printer issues without even touching a calibration button.
Tools and Prep for Successful Calibration
Before you start a Zebra printer sensor calibration, you need the right kit. Using the wrong materials can scratch the sensor lens or leave residue that makes the media out fault even worse. I always keep a dedicated cleaning kit next to my industrial printers to ensure the job is done right the first time.
Essential Supplies for a Clean Thermal Printer Sensor
Don’t reach for paper towels or standard glass cleaners. You need materials that won’t leave behind fibers or chemicals.
- 90% or Higher Isopropyl Alcohol (IPA): High-purity alcohol evaporates quickly without leaving a film.
- Lint-Free Cloths or Swabs: These prevent tiny fibers from snagging on the sensor or printhead.
- Canned Air: Useful for blowing out large dust bunnies before the wet clean.
Safety and Handling Basics
Thermal printers are rugged, but their sensors are delicate. Always follow these steps to protect the hardware:
- Power Down: Always turn off the printer and unplug the power cable.
- Cooling Time: If you’ve been running a high-volume batch, let the printhead cool for a few minutes.
- No Metal Tools: Never use screwdrivers or knives to scrape off adhesive; you will ruin the transmissive sensor adjustment mechanism.
Brand-Specific Prep: Zebra ZT and ZD Series
Preparation varies slightly depending on your hardware. For the Zebra ZT series (industrial models), you’ll need to open the side media door and rotate the gold printhead lever up. For the Zebra ZD series (desktop models), you simply flip open the top lid and move the green media guides out of the way. Regardless of the model, you should have aEssential Tools for Media Sensor Calibration
Before you dive into the settings, you need the right gear. A successful manual calibration starts with a clean slate. I always keep a dedicated maintenance kit on hand to ensure the media sensor can actually “see” the labels.
- 99.7% Isopropyl Alcohol (IPA): Don’t use standard rubbing alcohol; the high water content can damage electronics.
- Lint-Free Cloths: Microfiber or specialized swabs are best. Avoid paper towels or tissues, as they leave behind dust that triggers a false media out error.
- Compressed Air: Useful for blowing out stubborn paper dust from the transmissive sensor tracks.
Safety and Handling Protocols
Thermal printers are durable, but their sensors and printheads are sensitive. Before touching any internal components to fix media out fault issues, follow these steps:
- Power Down: Always turn off the printer and unplug the power cable. This prevents static discharge and electrical shorts while you’re cleaning.
- Cooling Period: If the printer has been running a high-volume job, give the printhead a few minutes to cool down.
- Hands Off: Avoid touching the glass surface of the printhead or the sensor lens with your bare fingers. Oils from your skin can degrade the hardware over time.
Brand-Specific Prep: Zebra ZT and ZD Series
The setup for a Zebra printer sensor calibration varies depending on the model’s form factor.
| Printer Series | Loading Style | Sensor Access |
|---|---|---|
| Zebra ZT Series (Industrial) | Side-loading | Swing the printhead lever up. Locate the gold-colored sensor adjustment dial. |
| Zebra ZD Series (Desktop) | Clamshell | Open the lid fully. The sensors are usually fixed or have a small slider in the center of the media path. |
For the Zebra ZT series, ensure the media guides are snug but not tight. If the labels are “walking” or shifting, the media sensor alignment will never be consistent, no matter how many times you calibrate. Clean the sensor eye directly with an IPA swab before starting the electronic calibration process.
How to Calibrate Your Media Sensor
Getting your hardware back on track shouldn’t take all day. When the “Media Out” error persists despite your labels being loaded correctly, you need to recalibrate the hardware to recognize the media’s gap, notch, or black mark. This process “teaches” the printer’s sensors exactly where one label ends and the next begins.
Using SmartCal for a 30-Second Fix
For most modern Zebra printer sensor calibration needs, the SmartCal feature is the fastest solution. This automatic process bypasses complex menus to fix common detection issues:
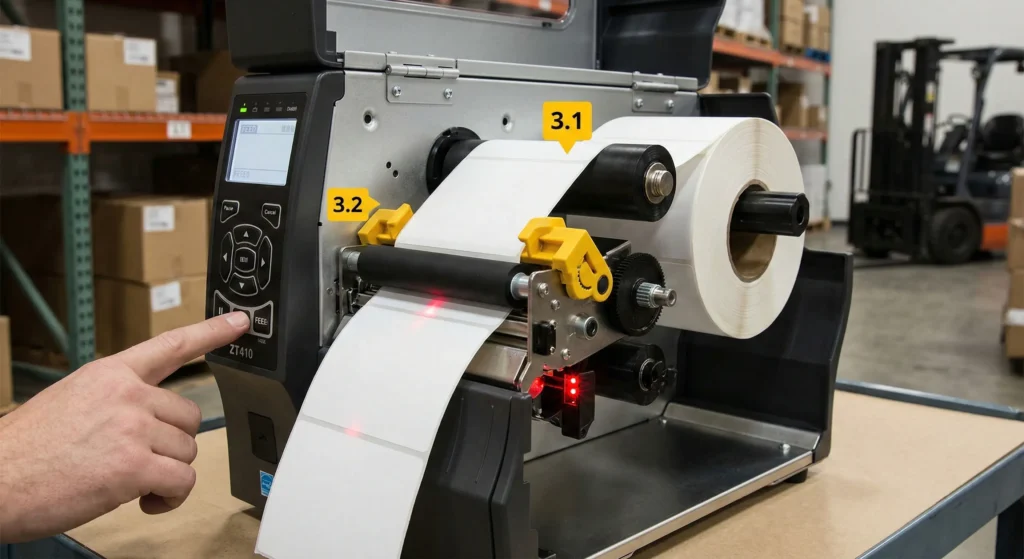
- Load your media as you normally would, ensuring the labels are under the sensor.
- Press and hold the Feed button on the control panel until the status light flashes twice.
- Release the button. The printer will feed a few labels to measure the backing and gap.
- Check the light. A solid green light indicates a successful SmartCal media calibration.
Manual Calibration Steps for Stubborn Errors
If the automatic shortcut doesn’t clear the media out error, you’ll need to perform a manual calibration thermal printer routine. This is the “deep dive” for printers that have lost their sense of timing:
- Enter Calibration Mode: Open the printhead and remove the labels, leaving the ribbon (if applicable) in place.
- Sense the Backing: Close the printhead and press the “Calibrate” button. The printer now measures the light passing through just and End “Media Out” Errors
When your printer stops recognizing your labels, a quick recalibration is usually the cure. I recommend starting with the fastest method before moving into manual adjustments. Proper media sensor alignment ensures the printer “sees” the gap or mark accurately every time.
The 30-Second Fix: Using SmartCal
Most modern Zebra printers feature SmartCal media calibration. This is my go-to for a fast resolution without digging into complex menus.
- Ensure the printer is ready: Load your media and ribbon correctly.
- Initiate the shortcut: Press and hold the Pause + Feed buttons for two seconds.
- Watch the lights: The printer will feed a few blank labels to measure the backing and the label length.
- Check the status: Once the status light turns solid green, your Zebra printer sensor calibration is complete.
Manual Calibration for Stubborn Errors
If the quick fix doesn’t take, a manual calibration thermal printer routine is necessary. This forces the printer to “learn” the specific thickness of your liner and the opacity of your ribbon.
- Enter Calibration Mode: Navigate to the “Tools” or “Sensors” menu and select Media/Ribbon Calibration.
- Remove Labels: Peel off a few labels so only the liner (backing) is over the sensor.
- Calibrate the Liner: Follow the screen prompts to “Reload” or “Calibrate.” This sets the baseline for “empty” space.
- Calibrate the Ribbon: If you are using thermal transfer, ensure the ribbon is installed correctly during this phase so the ribbon sensor calibration records the correct light transmission.
- Reload and Test: Put the labels back in and press Feed. The printer should now stop exactly at the tear-off point.
Aligning Movable Sensors for Different Label Types
If you use circular, die-cut, or notched labels, your media sensor alignment is critical. A misplaced sensor is a leading cause of the false media out error.
- Find the Sensor: Look for the small “eye” or “arrow” inside the media path.
- Positioning: For standard rectangular labels, keep the sensor centered.
- Special Shapes: If you use notches or holes on the side of the web, move the transmissive sensor adjustment lever until the sensor is directly under that notch.
- Black Marks: If your labels have black bars on the back, ensure the reflective sensor is positioned to pass directly over the marks.
| Feature | Sensor Position | Sensor Type |
|---|---|---|
| Standard Gap | Centered | Gap/Transmissive |
| Side Notch | Aligned with Notch | Gap/Transmissive |
| Black Mark | Over the Mark | Reflective |
Cleaning for Better Detection: Eliminating “Media Out” Errors
I’ve seen it hundreds of times: a printer is perfectly loaded, yet the “Media Out” light won’t stop blinking. Before you dive into complex software fixes, you need to look at the physical state of your hardware. Most false media out error causes stem from simple debris.
Thermal labels are inherently “dirty” products. As they travel through the printer, they shed microscopic paper dust. Over time, this dust—combined with leaked adhesive from the edges of the labels—forms a cloudy film over the sensor lenses. This film blocks the transmissive sensor or reflective beam, leading the printer to believe the media path is empty.
Step-by-Step Guide to Clean Thermal Printer Sensors
To maintain peak performance and avoid unnecessary downtime, I follow this specific cleaning regimen:
- Isolate the Sensor: Open the printhead and locate both the upper and lower sensor eyes.
- Use the Right Supplies: Only use 99% Isopropyl Alcohol (IPA) and a lint-free cloth or specialized cleaning swab. Never use “wet wipes” or glass cleaners, as they leave a residue that makes the problem worse.
- Gentle Friction: Lightly rub the sensor lenses to break up any hardened adhesive.
- Clear the Path: Use a can of compressed air to blow out any paper “chaff” hiding in the sensor track that a cloth can’t reach.
Knowing When a Sensor is Dirty vs. Dead
If you’ve performed a thorough clean thermal printer sensor routine and the error persists, you need to determine if the hardware has actually failed. Use this quick diagnostic table to tell the difference:
| Symptom | Likely Cause | Solution |
|---|---|---|
| Sensor values fluctuate when labels are moved | Dirty Sensor | Deep clean with IPA and compressed air. |
| Sensor values stay at 0 or 255 regardless of media | Dead Sensor | Hardware replacement or cable check. |
| Error only happens on certain label rolls | Media Quality | Check for “clear” liners or high-opacity backing. |
| Light beam is visible but not “reading” | Misalignment | Perform a manual calibration thermal printer sequence. |
A sensor is rarely “dead” out of nowhere. If the printer was working fine yesterday and failing today, it’s almost always a build-up of gunk or a slight media sensor alignment shift. Don’t rush to buy replacement parts until you’ve cleared the “eye” of the machine.
What to Do When Calibration Fails
Sometimes, a standard calibration doesn’t stick. If your printer continues to throw a media out fault despite following the manual steps, the hardware might be “ignoring” the command due to a logical glitch or a deeper configuration conflict.
Fixing Printers That Ignore Calibration Commands
When a printer refuses to recognize new settings, it is often because the sensor type (Gap/Notch vs. Mark) is incorrectly set in the driver.
- Driver Override: Ensure your PC driver settings match the printer’s physical configuration. A driver set to “Continuous” will ignore any attempt to calibrate for gaps.
- Communication Check: Use a generic text editor or printer utility to send a ~JC (Set Sensor Calibration) command directly to the device to bypass software interference.
Troubleshooting Intermittent Sensor Faults
If the thermal printer media out error appears randomly mid-print, the issue is likely environmental or mechanical:
- Media Path Obstructions: Check for label dust or adhesive buildup on the transmissive sensor path.
- Voltage Fluctuations: Ensure the power supply is stable; weak power can cause the sensor eye to flicker.
- Media Shifting: Verify that the media guides are snug. If the labels “walk” left or right, the sensor loses its reference point.
The “Nuclear Option”: Resetting to Factory Defaults
When all else fails, a factory reset is the most effective way to clear corrupt internal memory and start fresh.
| Reset Level | What it Fixes | Result |
|---|---|---|
| Network Reset | Connectivity drops | Clears IP settings |
| Sensor Reset | False media out error | Restores default sensitivity |
| Full Factory Reset | Persistent logic errors | Wipes all custom configurations |
To perform a factory reset: Most Zebra ZT and ZD series printers allow this via the front panel menu under “Settings” or by holding the Pause + Feed buttons during power-up. Once the reset is complete, perform a manual calibration immediately to re-sync the hardware with your specific media.
Proactive Tips to Prevent Media Errors
Fixing a “Media Out” error is satisfying, but never having one pop up in the middle of a busy shift is even better. I’ve found that a little bit of proactive care goes a long way in keeping your thermal printer running smoothly. You don’t need to be a technician to maintain these machines; you just need a solid routine. Here is how I keep my equipment reliable and avoid those frustrating false alarms.
Create a Routine Sensor Maintenance Schedule
The number one reason for a thermal printer media out error is simply dirt. Dust from paper labels and residue from adhesives build up over time, blinding the sensors. I recommend cleaning the sensors every time you change a roll of labels or ribbon. It takes ten seconds but saves hours of troubleshooting later.
- Daily/Per Roll: Quick wipe of the media path and sensor with a lint-free cloth.
- Weekly: Deep clean the sensor lens with Isopropyl Alcohol (IPA) to remove stubborn adhesive.
- Monthly: Check the platen roller and sensor alignment to ensure nothing has shifted.
Best Practices for Label Storage and Handling
Believe it or not, how you store your labels affects your sensor’s ability to read them. If your labels are stored in a hot, humid warehouse, the liner can warp, or the adhesive can bleed. This confuses the gap sensor, leading to a false media out error.
- Keep it Cool and Dry: Store media in a climate-controlled environment to prevent curling.
- Don’t Stack Too High: Heavy stacking can crush the label liner, making the gap harder for the sensor to detect.
- Fan the Stack: Before loading, fan the labels slightly to separate them and remove static electricity, which helps the printer feed them smoothly.
Keep Firmware Updated for Better Detection Logic
Hardware is only half the battle. Manufacturers like Zebra frequently release firmware updates that improve the “brain” of the printer. These updates often include better algorithms for media sensor alignment and detection logic, making the printer smarter at distinguishing between a label and the liner. If you are running five-year-old firmware, you are missing out on these stability improvements. Check the manufacturer’s site regularly—keeping your system current is the easiest way to prevent media out errors before they happen.
FAQs: Eliminating “Media Out” Errors
Why does my printer say “Media Out” with labels loaded?
The most common reason for a false Media Out error is a misaligned sensor or a sensor blocked by dust and adhesive. If the sensor is set to “Gap” but you are using “Black Mark” labels, the printer won’t see the trigger and will assume the roll is empty. Check that your media is threaded correctly through the sensor eye and that the sensor hasn’t been nudged out of position.
How often should I calibrate my thermal printer?
You should perform a thermal printer sensor calibration whenever you switch to a different label size, manufacturer, or material type. For high-volume operations, a quick calibration once a week—or after every roll change—keeps the media sensor alignment precise and prevents unexpected downtime.
Can dirty sensors cause permanent damage?
While a dirty sensor usually just causes thermal printer not detecting labels errors, ignoring it can lead to trouble. Hardened adhesive buildup can eventually scratch the sensor lens or cause the printer to overheat as it struggles to find the “Top of Form.” Regularly cleaning thermal printer sensors with IPA is a cheap way to avoid expensive hardware replacements.
What is the difference between gap and black mark sensors?
Understanding the gap sensor vs reflective sensor mechanics is key to troubleshooting:
- Gap (Transmissive) Sensor: Shines light through the label liner to detect the space between labels.
- Black Mark (Reflective) Sensor: Bounces light off the back of the media to find a printed black line.
| Sensor Type | Media Type | How it Works |
|---|---|---|
| Transmissive | Standard Die-cut Labels | Detects light passing through the gap. |
| Reflective | Black Mark Tags | Detects a change in light reflection. |
| Continuous | Tape/Receipts | Sensor is typically disabled. |
How do I fix a media out fault on a thermal label printer quickly?
The fastest fix is often a SmartCal media calibration. On most modern Zebra ZT and ZD series, holding the Pause and Cancel buttons (or using the dedicated Calibrate button) for a few seconds forces the printer to measure the liner thickness and reset its thresholds. If this fails, a manual calibration through the printer menu is your next best step.
